
在本教程中,你将使用 Cloudflare Workers 构建 Slack ↗ bot。你的 bot 将利用 GitHub webhook 在 issue 更新或创建时向 Slack 频道发送消息,并允许用户编写 command 在 Slack 内查找 GitHub issue。
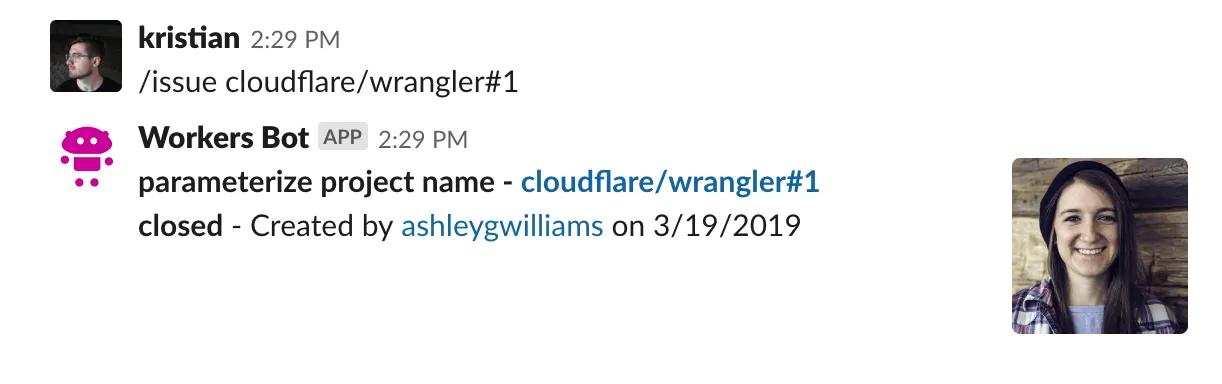
本教程推荐给熟悉编写 Web 应用的人。你将使用 TypeScript 作为编程语言,Hono ↗ 作为 Web 框架。如果你使用 Node ↗ 和 Express ↗ 等工具构建过应用,本项目会让你感到非常熟悉。如果你是 Web 应用新手,或过去想构建 Slack bot 但被部署或配置吓退,Workers 将让你专注于编写代码和交付项目。
如果想在继续本教程之前查看代码或 bot 在实际 Slack 频道中的工作方式,可以在 GitHub ↗ 上访问代码库的最终版本。从 GitHub,你可以添加自己的 Slack API 密钥并部署到自己的 Slack 频道进行测试。
所有教程都假设你已经完成了快速入门指南,该指南帮助你设置 Cloudflare Workers 账户、C3 ↗ 和 Wrangler。
本教程假设你已有 Slack 账户,并能够创建和管理 Slack 应用。
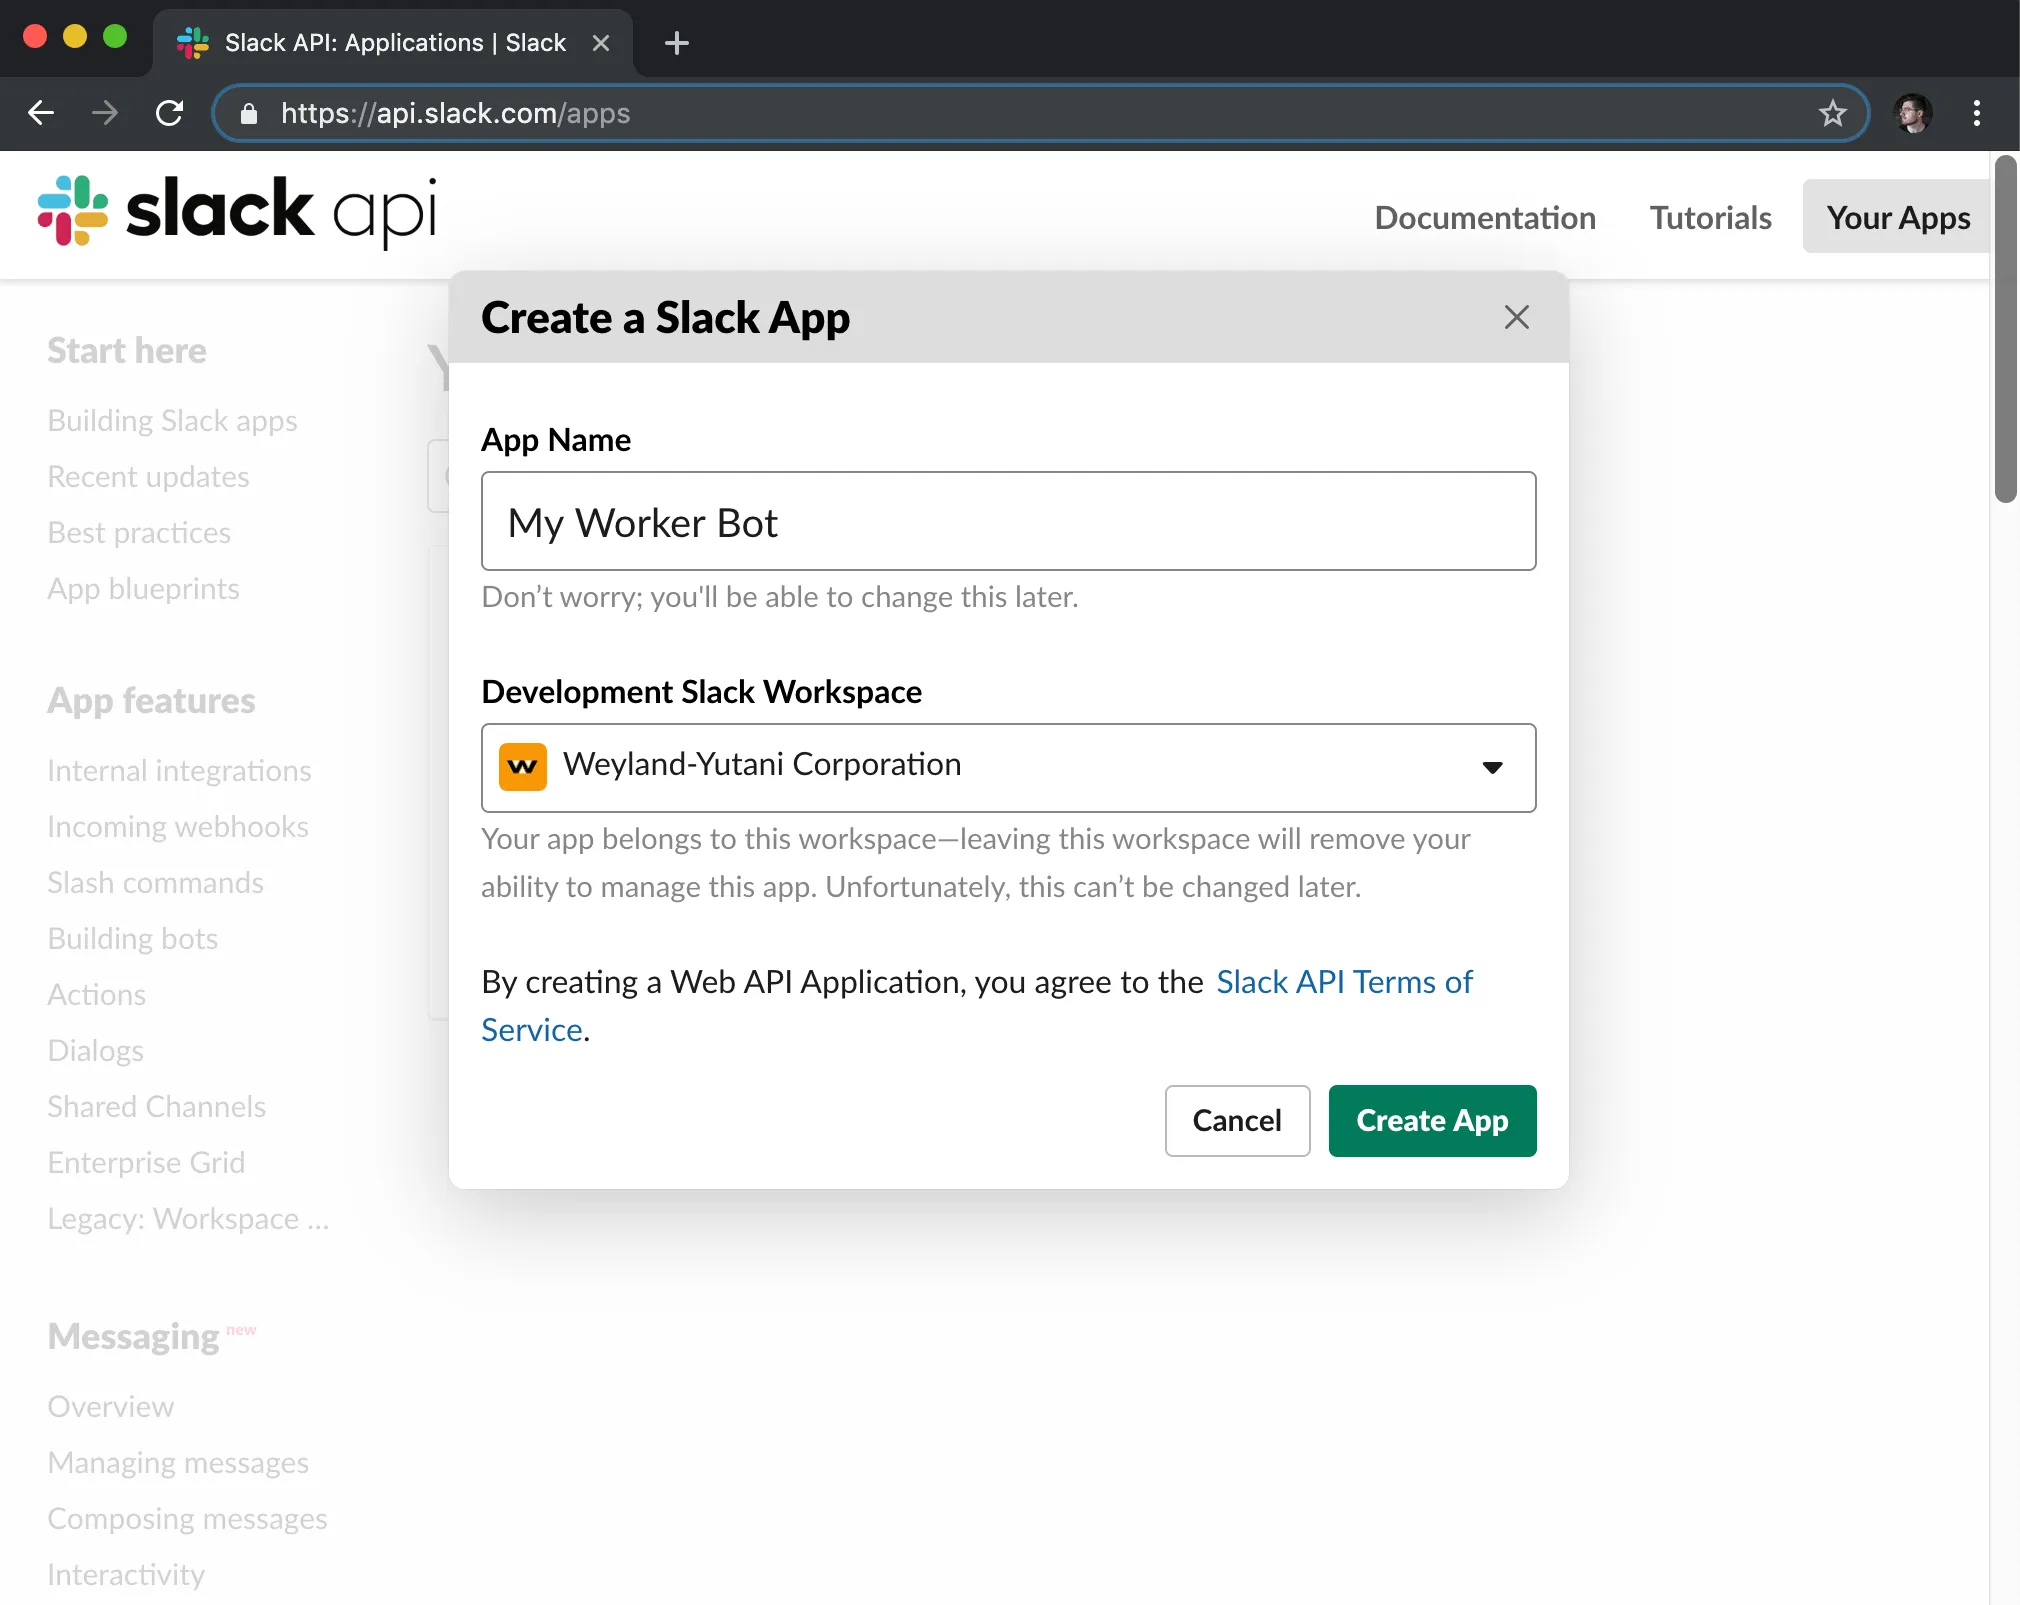
要从 Cloudflare Worker 向 Slack 频道发布消息,你需要在 Slack UI 中创建应用。为此,前往 Slack API 部分 api.slack.com/apps ↗,并选择 Create New App(创建新应用)。
Slack 应用有许多功能。你将使用其中两个——Incoming Webhook 和 Slash Command——来构建由 Worker 驱动的 Slackbot。
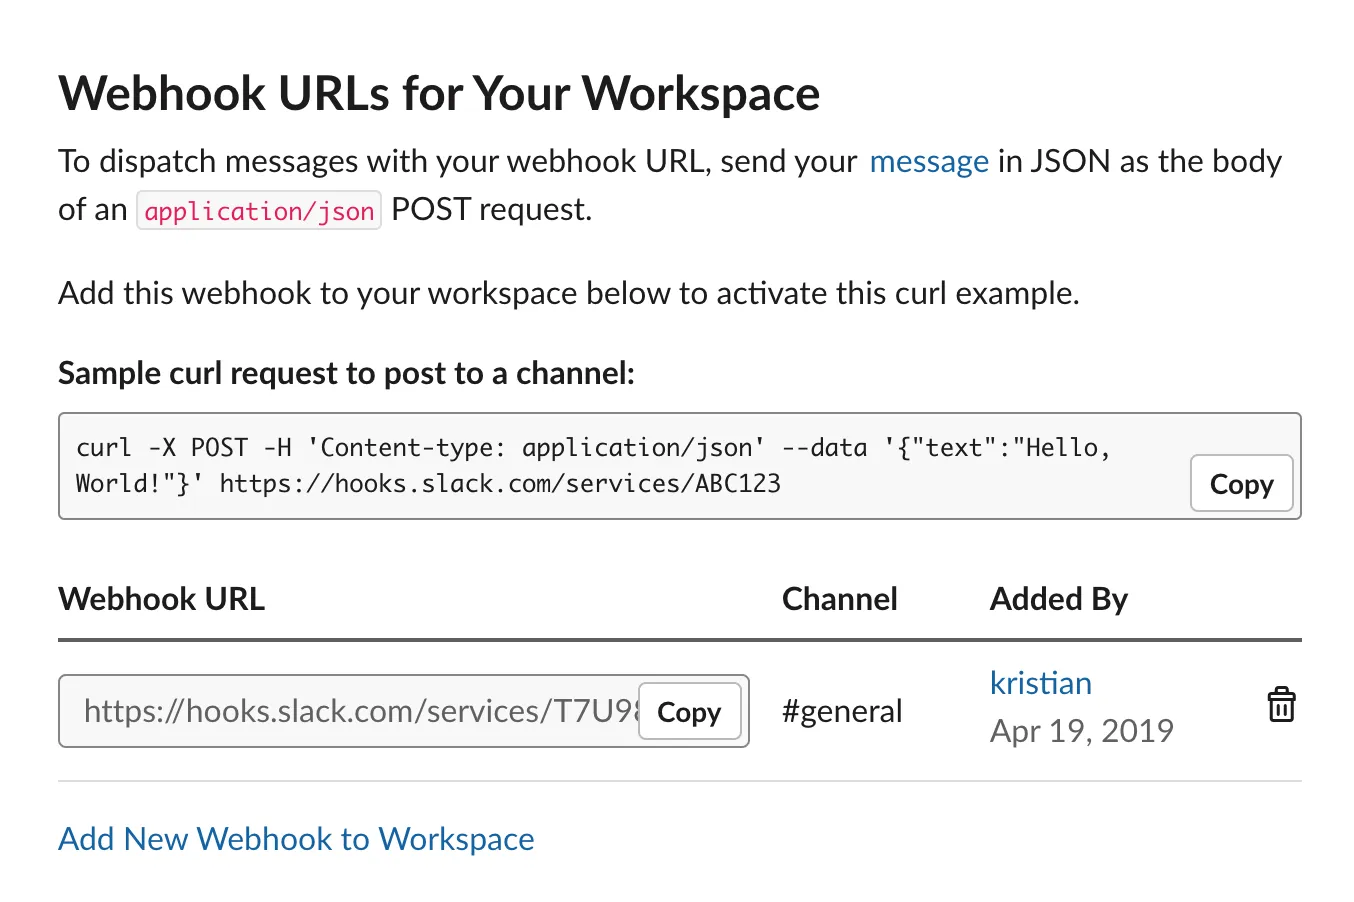
Incoming Webhook 是可用于向 Slack 频道发送消息的 URL。你的 incoming webhook 将与 GitHub 的 webhook 支持配对,在给定仓库的 issue 有更新时向 Slack 频道发送消息。构建应用时你将更详细地看到代码。首先,创建 Slack webhook:
- 在 Slack UI 的侧边栏中,选择 Incoming Webhooks(传入 Webhook)。
- 在 Webhook URLs for your Workspace(工作区的 Webhook URL) 中,选择 Add New Webhook to Workspace(向工作区添加新 Webhook)。
- 在下一屏幕中,选择 webhook 要发送消息的频道(可以选择房间,如 #general 或 #code,或在调用 webhook 时由 Slackbot 直接私信你。)
- 授权新的 webhook URL。
授权 webhook URL 后,你将返回 Incoming Webhooks(传入 Webhook) 页面并可以查看新的 webhook URL。稍后你将把它添加到 Workers 代码中。接下来,你将为 Slackbot 添加第二个组件:Slash Command。
Slack 中的 Slash Command 是可以附加到 URL 请求的自定义 command。例如,如果配置 /weather <zip>,Slack 将向配置的 URL 发出 HTTP POST 请求,传递 <zip> 文本以获取指定邮编的天气。在你的应用中,你将使用 /issue command 通过 GitHub API ↗ 查找 GitHub issue。输入 /issue cloudflare/wrangler#1 将在 HTTP POST 请求中向应用发送 cloudflare/wrangler#1 文本,应用将用它查找相关 GitHub issue ↗。
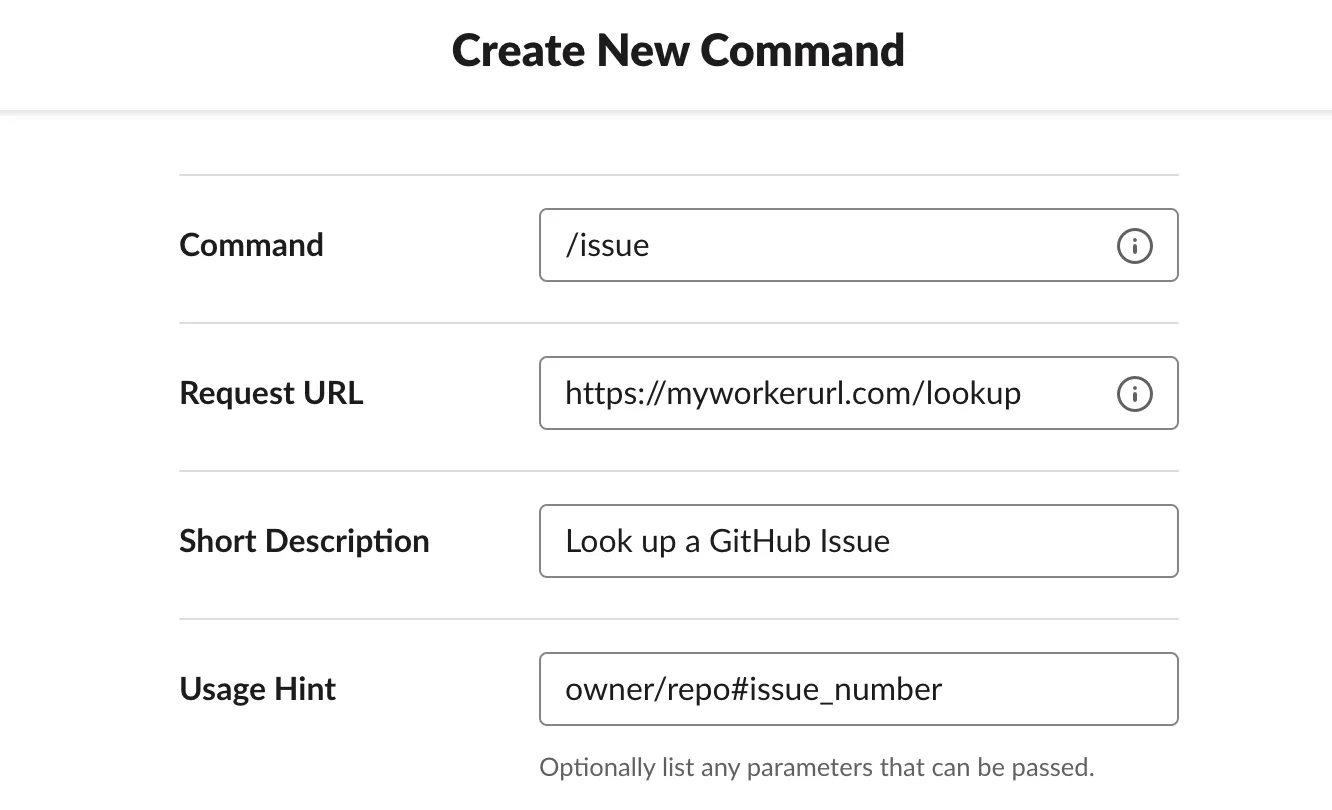
- 在 Slack 侧边栏中,选择 Slash Commands(斜杠命令)。
- 创建你的第一个 slash command。
在本教程中,你将使用 /issue command。Request URL 应为应用 URL 上的 /lookup 路径:例如,如果应用托管在 https://myworkerurl.com,Request URL 应为 https://myworkerurl.com/lookup。
你的 Cloudflare Workers 应用将能够处理来自 Slack 的传入请求。它还应该能够直接从 GitHub 接收事件。如果 GitHub issue 被创建或更新,你可以利用 GitHub webhook 将该事件发送到 Workers 应用并在 Slack 中发布相应消息。
要配置 webhook:
- 前往 GitHub 仓库的 Settings(设置) > Webhooks > Add webhook(添加 webhook)。
如果你有类似 https://github.com/user/repo 的仓库,可以直接在 https://github.com/user/repo/settings/hooks 访问 Webhooks 页面。
- 将 Payload URL 设置为 Worker URL 上的
/webhook路径。
例如,如果 Worker 托管在 https://myworkerurl.com,Payload URL 应为 https://myworkerurl.com/webhook。
- 在 Content type(内容类型) 下拉菜单中,选择 application/json。
payload 的 Content type(内容类型) 可以是 URL 编码 payload(application/x-www-form-urlencoded)或 JSON(application/json)。出于本教程目的并便于解析发送到应用的 payload,选择 JSON。
- 在 Which events would you like to trigger this webhook?(希望哪些事件触发此 webhook?) 中,选择 Let me select individual events(让我选择单个事件)。
GitHub webhook 允许你指定要发送到 webhook 的事件。默认情况下,webhook 将发送仓库的 push 事件。出于本教程目的,你将选择 Let me select individual events(让我选择单个事件)。
- 选择 Issues(议题) 事件类型。
可以为 webhook 启用许多不同的事件类型。选择 Issues(议题) 将向 webhook 发送每个与 issue 相关的事件,包括 issue 被打开、编辑、删除等。如果将来想扩展 Slackbot 应用,可以在教程完成后选择更多这些事件。
- 选择 Add webhook(添加 webhook)。
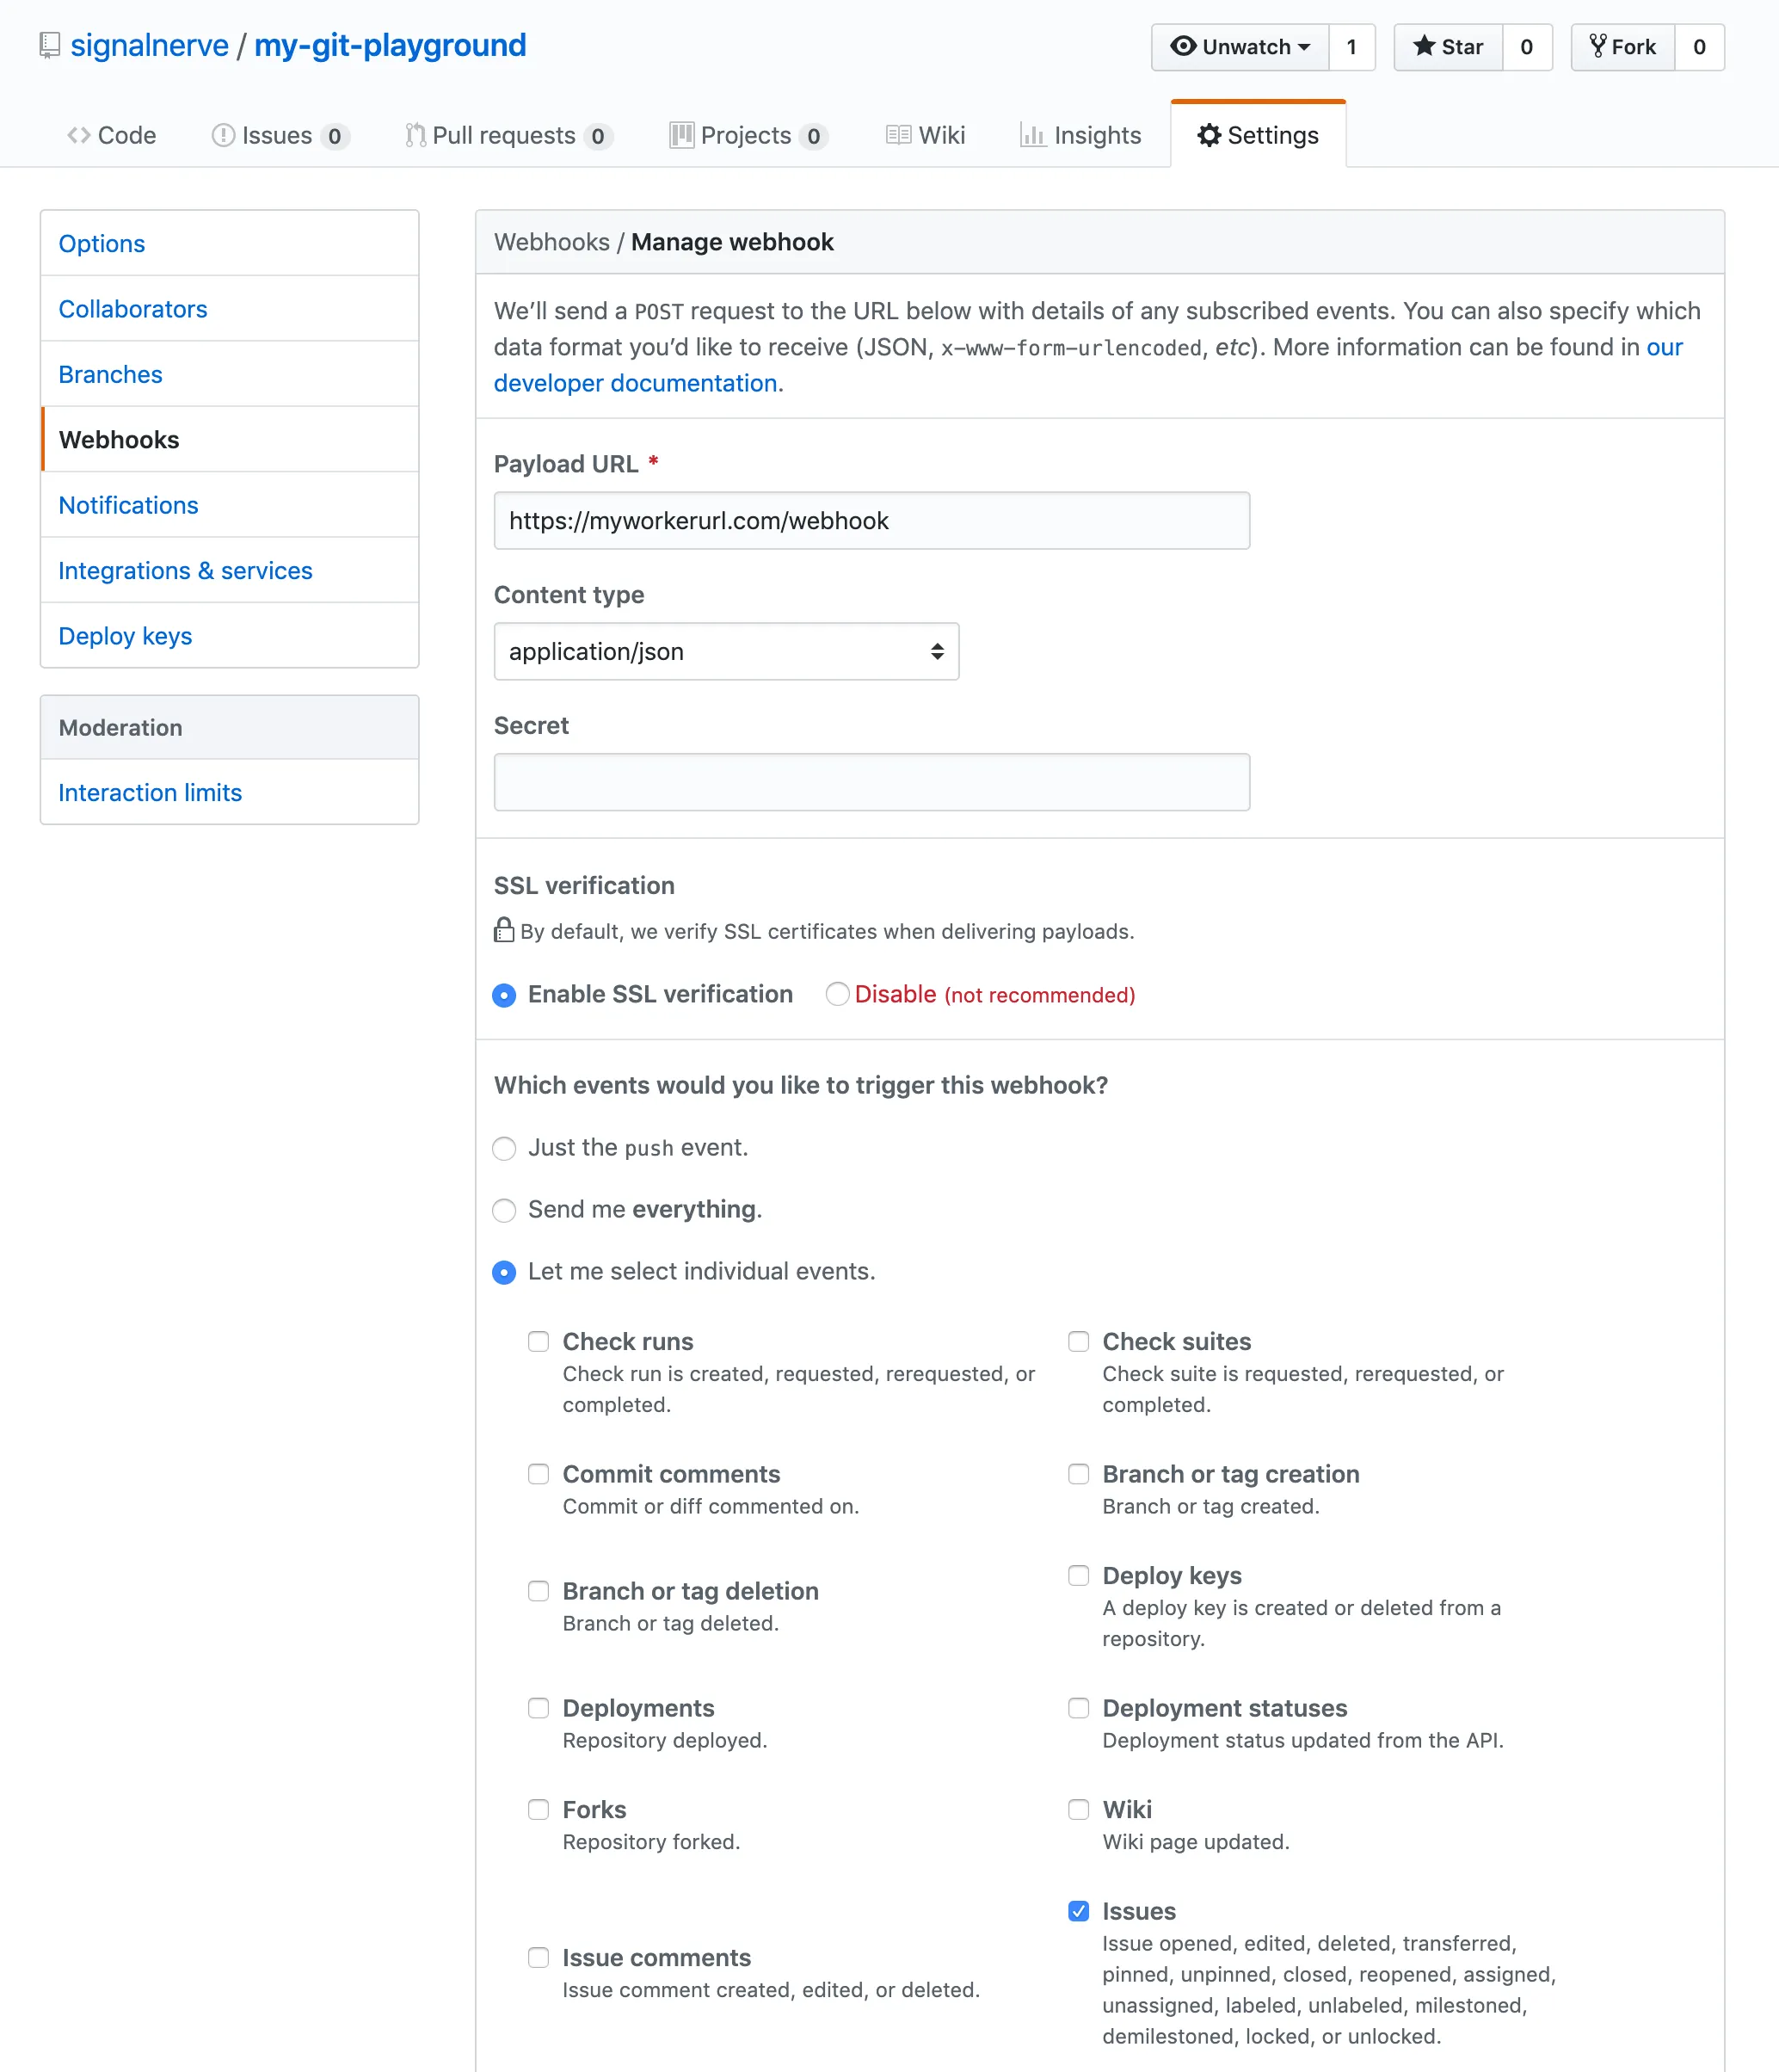
创建 webhook 后,它将尝试向应用发送测试 payload。由于应用尚未实际部署,请保持配置不变。应用部署后,你将返回仓库创建、编辑和关闭一些 issue,以确保 webhook 正常工作。
要初始化项目,使用命令行界面 C3 (create-cloudflare-cli) ↗。
npm create cloudflare@latest -- slack-botyarn create cloudflare slack-botpnpm create cloudflare@latest slack-bot按照以下步骤创建 Hono 项目。
- 对于 What would you like to start with?,选择
Framework Starter。 - 对于 Which development framework do you want to use?,选择
Hono。 - 对于 Do you want to deploy your application?,选择
No。
进入 slack-bot 目录:
cd slack-bot在编辑器中打开 src/index.ts 查看以下代码。
import { Hono } from "hono";

type Bindings = {
	[key in keyof CloudflareBindings]: CloudflareBindings[key];
};

const app = new Hono<{ Bindings: Bindings }>();

app.get("/", (c) => {
	return c.text("Hello Hono!");
});

export default app;
这是使用 Hono 的最小应用。如果对路径 / 进行 GET 访问,它将返回文本为 Hello Hono! 的响应。如果访问任何其他路径或方法,它还会返回状态码 404 的 404 Not Found 消息。
要在本地机器上运行应用,执行以下命令。
npm i -- devyarn add devpnpm add devbun add dev服务器启动后在浏览器中访问 http://localhost:8787,即可看到消息。
Hono 帮助你轻松快速地创建 Workers 应用。
现在,让我们在 Cloudflare Workers 上创建 Slackbot。
你可以将应用拆分为多个文件,而不是在一个文件中编写所有端点和函数。使用 Hono,可以通过 app.route() 函数将子应用的路由添加到父应用。
例如,想象以下 Web API 应用。
import { Hono } from "hono";

const app = new Hono();

app.get("/posts", (c) => c.text("Posts!"));
app.post("/posts", (c) => c.text("Created!", 201));

export default app;
可以在 /api/v1 下添加路由。
import { Hono } from "hono";
import api from "./api";

const app = new Hono();

app.route("/api/v1", api);

export default app;
访问 GET /api/v1/posts 时将返回 Posts!。
Slackbot 将有两个称为「route」的子应用。
-
lookup路由将接收来自 Slack 的请求(用户/issuecommand 时发送),并使用 GitHub API 查找对应的 issue。此应用将添加到主应用的/lookup。 -
当 GitHub 上的 issue 发生变化时(通过配置的 webhook),将调用
webhook路由。此应用将添加到主应用的/webhook。
在名为 routes 的目录中创建路由文件。
mkdir -p src/routes
touch src/routes/lookup.ts
touch src/routes/webhook.ts
然后更新主应用。
import { Hono } from "hono";
import lookup from "./routes/lookup";
import webhook from "./routes/webhook";

const app = new Hono();

app.route("/lookup", lookup);
app.route("/webhook", webhook);

export default app;在实现实际函数之前,你需要定义本项目将使用的 TypeScript 类型。在应用的 src/types.ts 创建新文件并编写代码。Bindings 是描述 Cloudflare Workers 环境变量的类型。Issue 是 GitHub issue 的类型,User 是 GitHub 用户的类型。稍后你将需要这些。
export type Bindings = {
	SLACK_WEBHOOK_URL: string;
};

export type Issue = {
	html_url: string;
	title: string;
	body: string;
	state: string;
	created_at: string;
	number: number;
	user: User;
};

type User = {
	html_url: string;
	login: string;
	avatar_url: string;
};开始在 src/routes/lookup.ts 中创建 lookup 路由。
import { Hono } from "hono";

const app = new Hono();

export default app;
要了解如何设计此函数,你需要了解 Slack slash command 如何将数据发送到 URL。
根据 Slack slash command 文档 ↗,Slack 向指定 URL 发送 HTTP POST 请求,内容类型为 application/x-www-form-urlencoded。例如,如果有人输入 /issue cloudflare/wrangler#1,你可以预期以下格式的数据 payload:
token=gIkuvaNzQIHg97ATvDxqgjtO
&team_id=T0001
&team_domain=example
&enterprise_id=E0001
&enterprise_name=Globular%20Construct%20Inc
&channel_id=C2147483705
&channel_name=test
&user_id=U2147483697
&user_name=Steve
&command=/issue
&text=cloudflare/wrangler#1
&response_url=https://hooks.slack.com/commands/1234/5678
&trigger_id=13345224609.738474920.8088930838d88f008e0
给定此 payload 正文,你需要解析它并获取 text 键的值。使用该 text(例如 cloudflare/wrangler#1),你可以将该字符串解析为已知数据(owner、repo 和 issue_number),并使用它向 GitHub API 发出请求以检索 issue 数据。
使用 Slack slash command,你可以通过返回结构化数据作为传入 slash command 的响应来回复。此例中,你应使用 GitHub API 的响应呈现 GitHub issue 的格式化版本,包括 issue 标题、创建者和创建日期等数据。Slack 的新 Block Kit ↗ 框架允许你使用 GitHub API 的数据构造文本和图片 blocks,返回详细的消息响应。
首先,lookup 路由应解析来自 Slack 的消息。如前所述,Slack API 以 URL Encoded 格式发送 HTTP POST。你可以通过 c.req.json() 解析获取 text 变量。
import { Hono } from "hono";

const app = new Hono();

app.post("/", async (c) => {
	const { text } = await c.req.parseBody();
	if (typeof text !== "string") {
		return c.notFound();
	}
});

export default app;
给定包含 cloudflare/wrangler#1 等文本的 text 变量,你应解析该文本并获取用于 GitHub API 的各个部分:owner、repo 和 issue_number。
为此,在应用的 src/utils/github.ts 创建新文件。此文件将包含多个用于 GitHub API 的「实用」函数。第一个是名为 parseGhIssueString 的字符串解析器:
const ghIssueRegex =
	/(?<owner>[\w.-]*)\/(?<repo>[\w.-]*)\#(?<issue_number>\d*)/;

export const parseGhIssueString = (text: string) => {
	const match = text.match(ghIssueRegex);
	return match ? (match.groups ?? {}) : {};
};
parseGhIssueString 接收 text 输入,与 ghIssueRegex 匹配,如果找到匹配,则返回该匹配的 groups 对象,利用正则表达式中定义的 owner、repo 和 issue_number 捕获组。通过从 src/utils/github.ts 导出此函数,你可以在 src/handlers/lookup.ts 中使用它:
import { Hono } from "hono";
import { parseGhIssueString } from "../utils/github";

const app = new Hono();

app.post("/", async (c) => {
	const { text } = await c.req.parseBody();
	if (typeof text !== "string") {
		return c.notFound();
	}

	const { owner, repo, issue_number } = parseGhIssueString(text);
});

export default app;有了这些数据,你可以向 GitHub 发出第一次 API 查询。再次在 src/utils/github.ts 中创建新函数,向 GitHub API 发出 fetch 请求以获取 issue 数据:
const ghIssueRegex =
	/(?<owner>[\w.-]*)\/(?<repo>[\w.-]*)\#(?<issue_number>\d*)/;

export const parseGhIssueString = (text: string) => {
	const match = text.match(ghIssueRegex);
	return match ? (match.groups ?? {}) : {};
};

export const fetchGithubIssue = (
	owner: string,
	repo: string,
	issue_number: string,
) => {
	const url = `https://api.github.com/repos/${owner}/${repo}/issues/${issue_number}`;
	const headers = { "User-Agent": "simple-worker-slack-bot" };
	return fetch(url, { headers });
};
回到 src/handlers/lookup.ts,使用 fetchGitHubIssue 向 GitHub API 发出请求并解析响应:
import { Hono } from "hono";
import { fetchGithubIssue, parseGhIssueString } from "../utils/github";
import { Issue } from "../types";

const app = new Hono();

app.post("/", async (c) => {
	const { text } = await c.req.parseBody();
	if (typeof text !== "string") {
		return c.notFound();
	}

	const { owner, repo, issue_number } = parseGhIssueString(text);
	const response = await fetchGithubIssue(owner, repo, issue_number);
	const issue = await response.json<Issue>();
});

export default app;从 GitHub API 收到响应后,最后一步是用 issue 数据构造 Slack 消息并返回给用户。最终结果将如下所示:
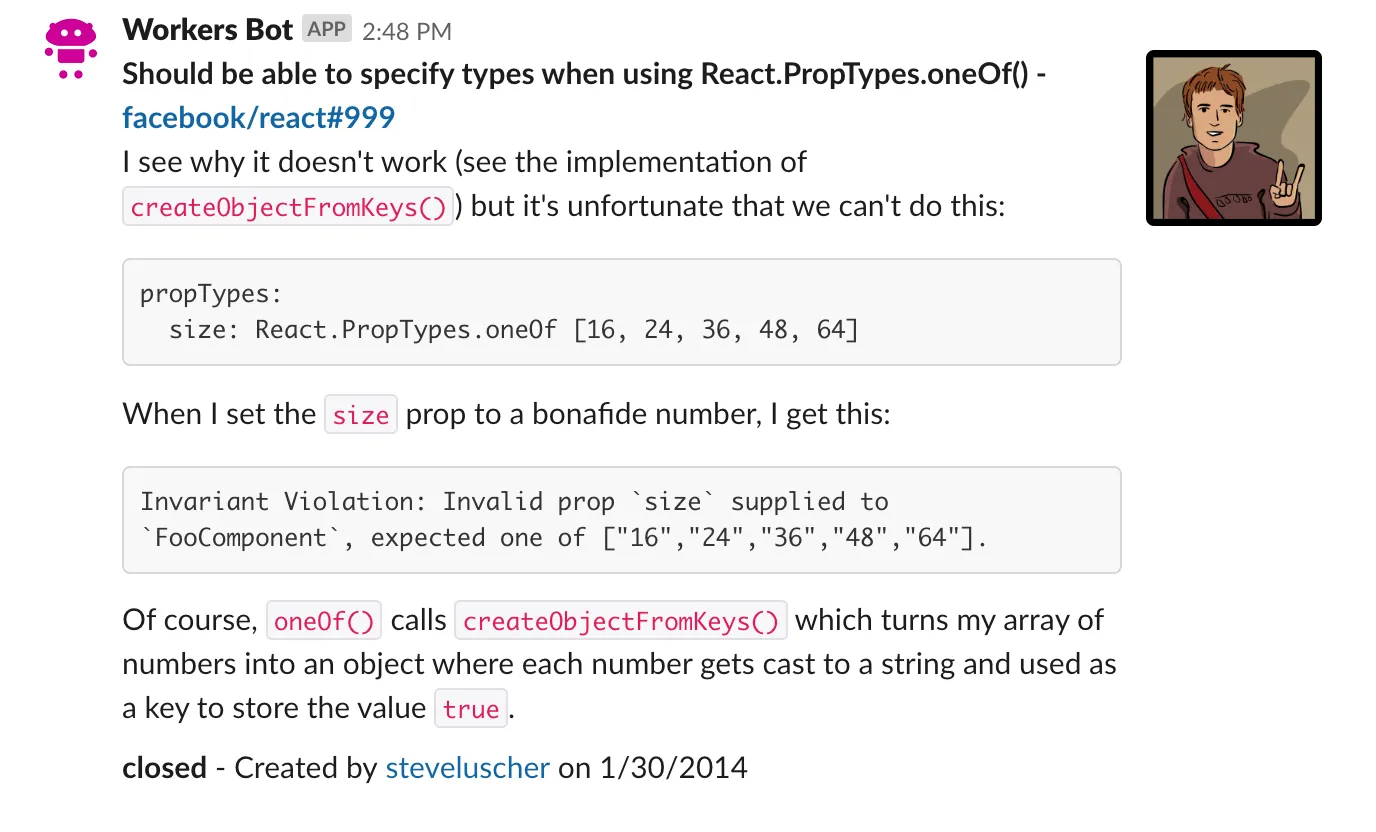
在上图截图中可以看到四个不同部分:
- 第一行(加粗)链接到 issue 并显示 issue 标题
- 以下行(包括代码片段)是 issue 正文
- 最后一行文本显示 issue 状态、issue 创建者(带指向用户 GitHub 资料的链接)和 issue 创建日期
- 右侧 issue 创建者的头像
前面提到的 Block Kit ↗ 框架将帮助获取 issue 数据(结构见 GitHub REST API 文档 ↗)并将其格式化为类似上述截图的内容。
创建另一个文件 src/utils/slack.ts,包含函数 constructGhIssueSlackMessage,用于获取 issue 数据并将其转换为 blocks 集合。Blocks 是 Slack 用于格式化消息的 JavaScript 对象:
import { Issue } from "../types";

export const constructGhIssueSlackMessage = (
	issue: Issue,
	issue_string: string,
	prefix_text?: string,
) => {
	const issue_link = `<${issue.html_url}|${issue_string}>`;
	const user_link = `<${issue.user.html_url}|${issue.user.login}>`;
	const date = new Date(Date.parse(issue.created_at)).toLocaleDateString();

	const text_lines = [
		prefix_text,
		`*${issue.title} - ${issue_link}*`,
		issue.body,
		`*${issue.state}* - Created by ${user_link} on ${date}`,
	];
};
Slack 消息接受 Markdown 变体,支持通过星号加粗文本(*bolded text*),以及 <https://yoururl.com|Display Text> 格式的链接。
给定该格式,构造 issue_link,它获取 GitHub API issue 数据的 html_url 属性(格式为 https://github.com/cloudflare/wrangler-legacy/issues/1)和 Slack slash command 发送的 issue_string,并将它们组合为 Slack 消息中的可点击链接。
user_link is similar, using issue.user.html_url (in the format https://github.com/signalnerve, a GitHub user) and the user’s GitHub username (issue.user.login), to construct a clickable link to the GitHub user.
最后,解析 ISO 8601 字符串 issue.created_at,将其转换为 JavaScript Date 实例,并格式化为 MM/DD/YY 格式的字符串。
这些变量就位后,text_lines 是 Slack 消息每行文本的数组。第一行是 issue 标题和 issue 链接,第二行是 issue 正文,最后一行是 issue 状态(例如 open 或 closed)、用户链接和创建日期。
文本构造完成后,你终于可以构造 Slack 消息,返回 Slack Block Kit ↗ 的 blocks 数组。此例中只有一个 block:带有 Markdown 文本的 section ↗ block,以及创建 issue 的用户的附属图片。在数组内返回该单个 block,以完成 constructGhIssueSlackMessage 函数:
import { Issue } from "../types";

export const constructGhIssueSlackMessage = (
	issue: Issue,
	issue_string: string,
	prefix_text?: string,
) => {
	const issue_link = `<${issue.html_url}|${issue_string}>`;
	const user_link = `<${issue.user.html_url}|${issue.user.login}>`;
	const date = new Date(Date.parse(issue.created_at)).toLocaleDateString();

	const text_lines = [
		prefix_text,
		`*${issue.title} - ${issue_link}*`,
		issue.body,
		`*${issue.state}* - Created by ${user_link} on ${date}`,
	];

	return [
		{
			type: "section",
			text: {
				type: "mrkdwn",
				text: text_lines.join("\n"),
			},
			accessory: {
				type: "image",
				image_url: issue.user.avatar_url,
				alt_text: issue.user.login,
			},
		},
	];
};在 src/handlers/lookup.ts 中,使用 constructGhIssueSlackMessage 构造 blocks,并在调用 slash command 时通过 c.json() 将它们作为新响应返回:
import { Hono } from "hono";
import { fetchGithubIssue, parseGhIssueString } from "../utils/github";
import { constructGhIssueSlackMessage } from "../utils/slack";
import { Issue } from "../types";

const app = new Hono();

app.post("/", async (c) => {
	const { text } = await c.req.parseBody();
	if (typeof text !== "string") {
		return c.notFound();
	}

	const { owner, repo, issue_number } = parseGhIssueString(text);
	const response = await fetchGithubIssue(owner, repo, issue_number);
	const issue = await response.json<Issue>();
	const blocks = constructGhIssueSlackMessage(issue, text);

	return c.json({
		blocks,
		response_type: "in_channel",
	});
});

export default app;
传入响应的额外参数是 response_type。默认情况下,对 slash command 的响应是 ephemeral 的,意味着只有编写 slash command 的用户能看到。如上所示,传入 response_type 为 in_channel 将使响应对频道中的所有用户可见。
如果希望消息保持私密,请删除 response_type 行。这将使 response_type 默认为 ephemeral。
lookup 路由几乎完成,但路由中可能发生多种错误,例如解析 Slack 的正文、从 GitHub 获取 issue 或构造 Slack 消息本身。虽然 Hono 应用可以无需任何操作处理错误,但你可以按以下方式自定义返回的响应。
import { Hono } from "hono";
import { fetchGithubIssue, parseGhIssueString } from "../utils/github";
import { constructGhIssueSlackMessage } from "../utils/slack";
import { Issue } from "../types";

const app = new Hono();

app.post("/", async (c) => {
	const { text } = await c.req.parseBody();
	if (typeof text !== "string") {
		return c.notFound();
	}

	const { owner, repo, issue_number } = parseGhIssueString(text);
	const response = await fetchGithubIssue(owner, repo, issue_number);
	const issue = await response.json<Issue>();
	const blocks = constructGhIssueSlackMessage(issue, text);

	return c.json({
		blocks,
		response_type: "in_channel",
	});
});

app.onError((_e, c) => {
	return c.text(
		"Uh-oh! We couldn't find the issue you provided. " +
			"We can only find public issues in the following format: `owner/repo#issue_number`.",
	);
});

export default app;你现在已完成 Workers 应用路由实现的一半。在实现下一个路由 src/routes/webhook.ts 时,你将复用已为 lookup 路由编写的大量代码。
在本教程开始时,你配置了 GitHub webhook 以跟踪仓库中与 issue 相关的任何事件。例如,当 issue 被打开时,Workers 应用上路径 /webhook 对应的函数应接收 GitHub 发送的数据,并在配置的 Slack 频道中发布新消息。
在 src/routes/webhook.ts 中,定义空白 Hono 应用。与 lookup 路由的区别在于 Bindings 作为 new Hono() 的泛型传入。这对于稍后使用的 SLACK_WEBHOOK_URL 提供适当的 TypeScript 类型是必需的。
import { Hono } from "hono";
import { Bindings } from "../types";

const app = new Hono<{ Bindings: Bindings }>();

export default app;
与 lookup 路由类似,你需要解析 request 内的传入 payload,从中获取相关 issue 数据(完整 payload 架构请参阅 GitHub API 关于 IssueEvent 的文档 ↗),并向 Slack 发送格式化消息以指示发生了什么变化。最终版本将如下所示:
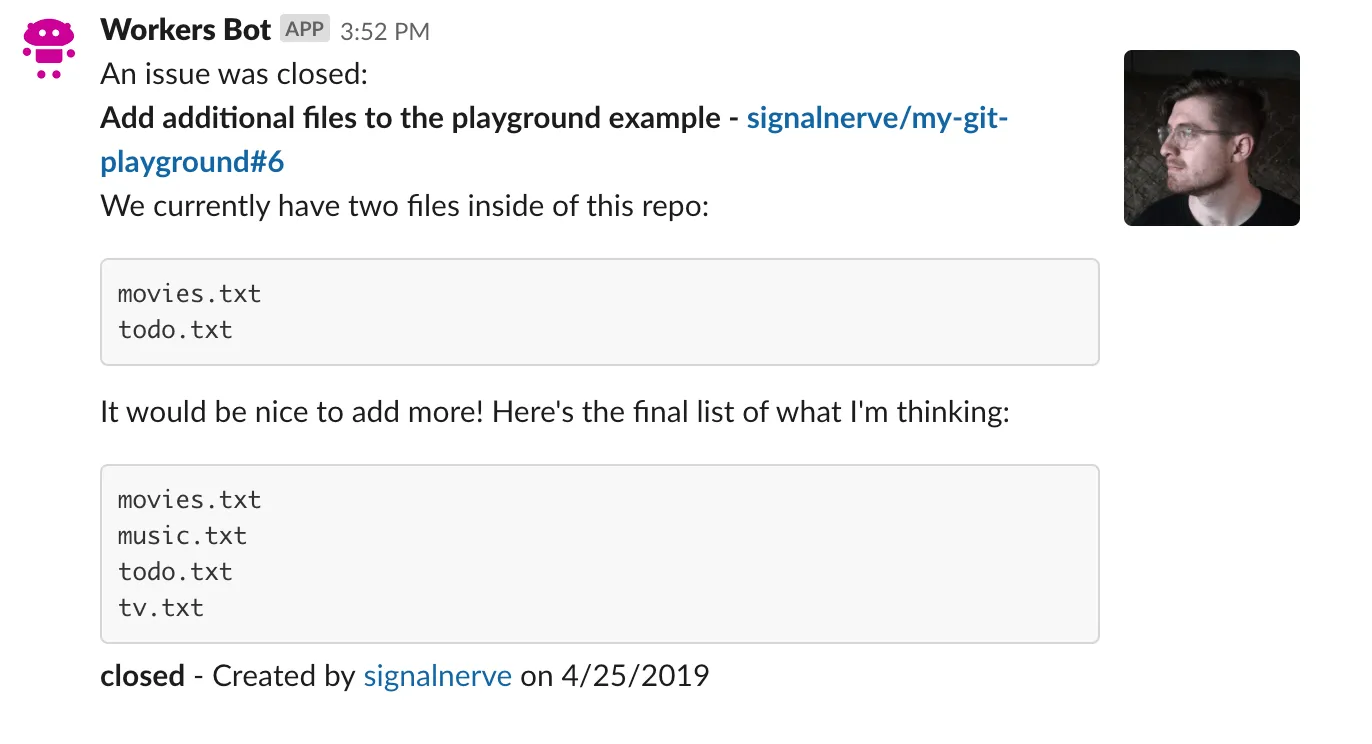
将此消息格式与用户 /issue slash command 返回的格式进行比较。你会发现两者之间只有一个实际区别:第一行添加了操作文本,格式为 An issue was $action:。此 action 作为 GitHub IssueEvent 的一部分发送,将在使用 Slack Block Kit 构造非常熟悉的 blocks 集合时使用。
开始填充路由,将格式化为 JSON 的请求正文解析为对象并构造一些辅助变量:
import { Hono } from "hono";
import { constructGhIssueSlackMessage } from "../utils/slack";

const app = new Hono();

app.post("/", async (c) => {
	const { action, issue, repository } = await c.req.json();
	const prefix_text = `An issue was ${action}:`;
	const issue_string = `${repository.owner.login}/${repository.name}#${issue.number}`;
});

export default app;
IssueEvent 是作为 webhook 配置的一部分从 GitHub 发送的 payload,包括 action(issue 发生了什么:例如被打开、关闭、锁定等)、issue 本身和 repository 等。
使用 c.req.json() 将请求的 payload 正文从 JSON 转换为普通 JS 对象。使用 ES6 解构将 action、issue 和 repository 设置为可在代码中使用的变量。prefix_text 是指示 issue 发生了什么的字符串,issue_string 是你之前见过的熟悉字符串 owner/repo#issue_number:虽然 lookup 路由直接使用 Slack 发送的文本填充 issue_string,但你将基于 JSON payload 中传递的数据直接构造它。
Slackbot 从 lookup 和 webhook 路由发送回 Slack 频道的消息非常相似。因此,你可以复用现有的 constructGhIssueSlackMessage 继续填充 src/handlers/webhook.ts。从 src/utils/slack.ts 导入该函数,并将 issue 数据传入:
import { Hono } from "hono";
import { constructGhIssueSlackMessage } from "../utils/slack";

const app = new Hono();

app.post("/", async (c) => {
	const { action, issue, repository } = await c.req.json();
	const prefix_text = `An issue was ${action}:`;
	const issue_string = `${repository.owner.login}/${repository.name}#${issue.number}`;
	const blocks = constructGhIssueSlackMessage(issue, issue_string, prefix_text);
});

export default app;
重要的是,此处理程序中对 constructGhIssueSlackMessage 的使用向函数添加了额外参数 prefix_text。更新 src/utils/slack.ts 中的对应函数,如果传入了 prefix_text,则将其添加到消息块中 text_lines 集合。
添加实用函数 compact,接收数组并过滤掉其中的 null 或 undefined 值。如果从 src/handlers/lookup.ts 调用时未实际传入 prefix_text,此函数将用于从 text_lines 中移除它。src/utils/slack.ts 的完整(最终)版本如下:
import { Issue } from "../types";

const compact = (array: unknown[]) => array.filter((el) => el);

export const constructGhIssueSlackMessage = (
	issue: Issue,
	issue_string: string,
	prefix_text?: string,
) => {
	const issue_link = `<${issue.html_url}|${issue_string}>`;
	const user_link = `<${issue.user.html_url}|${issue.user.login}>`;
	const date = new Date(Date.parse(issue.created_at)).toLocaleDateString();

	const text_lines = [
		prefix_text,
		`*${issue.title} - ${issue_link}*`,
		issue.body,
		`*${issue.state}* - Created by ${user_link} on ${date}`,
	];

	return [
		{
			type: "section",
			text: {
				type: "mrkdwn",
				text: compact(text_lines).join("\n"),
			},
			accessory: {
				type: "image",
				image_url: issue.user.avatar_url,
				alt_text: issue.user.login,
			},
		},
	];
};
回到 src/handlers/webhook.ts,从 constructGhIssueSlackMessage 返回的 blocks 成为新 fetch 请求(向 Slack webhook URL 发送的 HTTP POST 请求)的正文。请求完成后,返回状态码 200、正文文本为 "OK" 的响应:
import { Hono } from "hono";
import { constructGhIssueSlackMessage } from "../utils/slack";
import { Bindings } from "../types";

const app = new Hono<{ Bindings: Bindings }>();

app.post("/", async (c) => {
	const { action, issue, repository } = await c.req.json();
	const prefix_text = `An issue was ${action}:`;
	const issue_string = `${repository.owner.login}/${repository.name}#${issue.number}`;
	const blocks = constructGhIssueSlackMessage(issue, issue_string, prefix_text);

	const fetchResponse = await fetch(c.env.SLACK_WEBHOOK_URL, {
		body: JSON.stringify({ blocks }),
		method: "POST",
		headers: { "Content-Type": "application/json" },
	});

	return c.text("OK");
});

export default app;
常量 SLACK_WEBHOOK_URL 代表你在本教程传入 Webhook 部分创建的 Slack Webhook URL。
要在代码库中使用此常量,使用 wrangler secret 命令:
npx wrangler secret put SLACK_WEBHOOK_URLEnter a secret value: https://hooks.slack.com/services/abc123与 lookup 路由类似,webhook 路由应包含一些基本错误处理。与直接发送响应回 Slack 的 lookup 不同,如果 webhook 出现问题,生成错误响应并将其返回给 GitHub 可能更有用。
为此,使用 app.onError() 编写自定义错误处理程序,并返回状态码为 500 的新响应。src/routes/webhook.ts 的最终版本如下:
import { Hono } from "hono";
import { constructGhIssueSlackMessage } from "../utils/slack";
import { Bindings } from "../types";

const app = new Hono<{ Bindings: Bindings }>();

app.post("/", async (c) => {
	const { action, issue, repository } = await c.req.json();
	const prefix_text = `An issue was ${action}:`;
	const issue_string = `${repository.owner.login}/${repository.name}#${issue.number}`;
	const blocks = constructGhIssueSlackMessage(issue, issue_string, prefix_text);

	const fetchResponse = await fetch(c.env.SLACK_WEBHOOK_URL, {
		body: JSON.stringify({ blocks }),
		method: "POST",
		headers: { "Content-Type": "application/json" },
	});

	if (!fetchResponse.ok) throw new Error();

	return c.text("OK");
});

app.onError((_e, c) => {
	return c.json(
		{
			message: "Unable to handle webhook",
		},
		500,
	);
});

export default app;完成上述步骤后,你已完成 Slackbot 代码的编写。现在可以部署应用。
Wrangler 内置支持打包、上传和发布 Cloudflare Workers 应用。要执行此操作,运行以下命令,它将构建并部署你的代码。
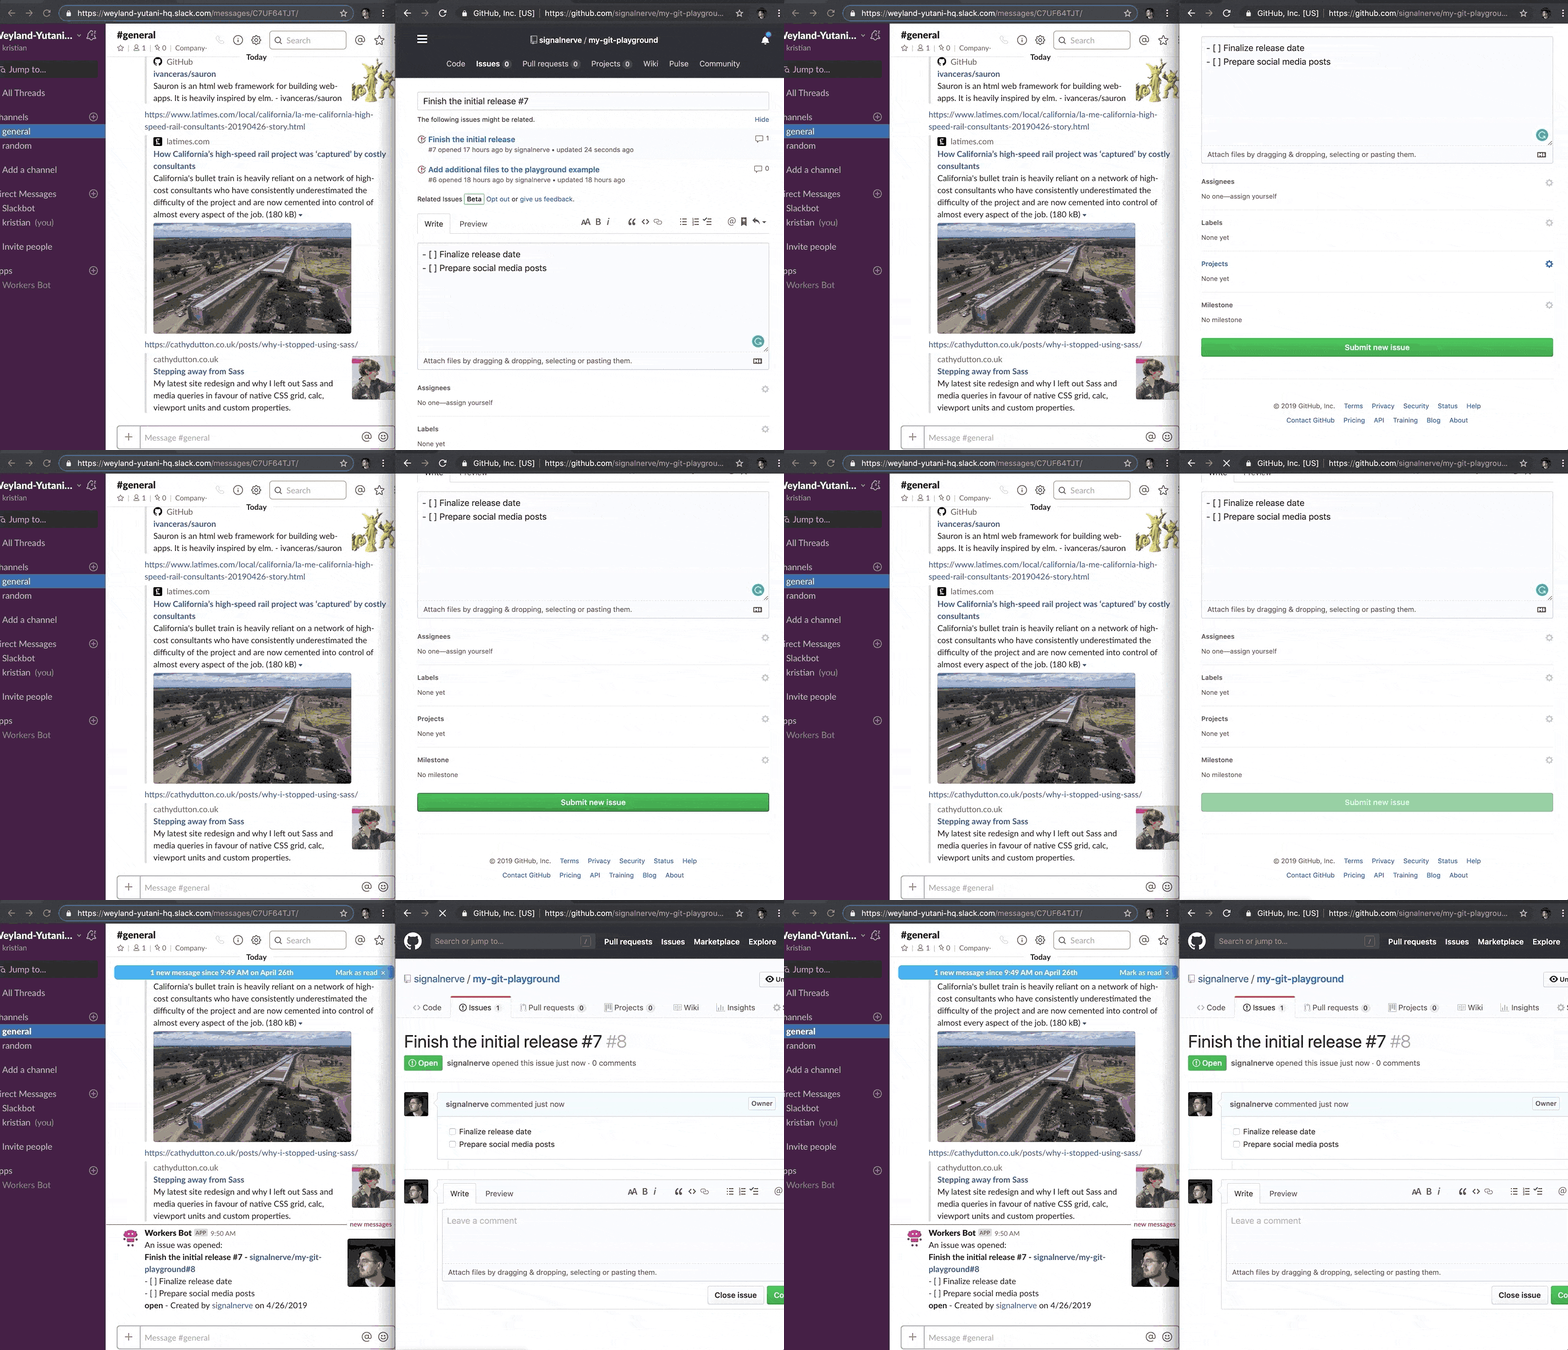
npm i -- deployyarn add deploypnpm add deploybun add deploy部署 Workers 应用后,issue 更新现在应开始出现在 Slack 频道中,因为 GitHub webhook 现在可以成功到达 Workers webhook 路由:
在本教程中,你构建并部署了一个 Cloudflare Workers 应用,能够响应 GitHub webhook 事件,并允许在 Slack 内进行 GitHub API 查询。如果想查看此应用的完整源代码,可以在 GitHub ↗ 上找到仓库。
如果想开始构建自己的项目,请查看现有的快速入门模板列表。