
本指南介绍如何使用 Workers Builds REST API 以编程方式触发构建、管理触发器并监控构建状态。示例使用 curl 命令,你可以直接在终端中运行或适配到你偏好的编程语言。部分示例通过 jq ↗ 过滤 JSON 响应——如果尚未安装,请先安装。
要使用 Builds API,你需要 API 令牌来验证请求。Builds API 需要用户范围的 API 令牌。不支持账户范围的令牌,将返回 "Invalid token" 错误。
在 dash.cloudflare.com/profile/api-tokens ↗ 创建令牌,具有以下权限:
| Permission | Access level | Why you need it |
|---|---|---|
| Workers Builds Configuration | Edit | 触发构建、管理触发器、配置环境变量 |
| Workers Scripts | Read | 仅 一个端点 需要,用于检索 Worker 的 tag(文档中记为 external_script_id) |
Builds API 通过 Worker 的 **tag(Cloudflare 分配的不变 UUID)**来标识 Worker。在 API 响应和参数中,此值显示为 external_script_id。
| Identifier | Example | Where it comes from |
|---|---|---|
Worker name (id) |
my-worker |
你为 Worker 指定的名称 |
Worker tag (external_script_id) |
1a2b3c4d5e6f7a8b9c0d1e2f3a4b5c6d |
Cloudflare 分配的不变 UUID |
引用 Worker 的每个 Builds API 端点都需要 tag,而不是名称。
Trigger 是定义 Worker 如何构建和部署的配置。它指定构建命令、部署命令、环境变量以及应触发构建的分支。每个 Worker 最多有两个 trigger:一个用于生产(在生产分支上运行),一个用于预览(在所有其他分支上运行)。要设置 trigger,请参阅从头开始设置 Workers Builds。
Trigger 字段:
| Field | Type | Description |
|---|---|---|
trigger_name |
string | Trigger 的显示名称 |
build_token_uuid |
string | 用于部署 Worker 的 build token 的 UUID。在 Worker 的 Settings(设置) > Builds(构建) > API token(API 令牌) 部分查找,或通过 GET /builds/tokens 端点获取。 |
build_command |
string | 构建项目的命令(例如 npm run build) |
deploy_command |
string | 部署 Worker 的命令(例如 npx wrangler deploy) |
root_directory |
string | 项目根目录路径 |
branch_includes |
array | 触发构建的分支模式(例如 ["main"] 或 ["*"]) |
branch_excludes |
array | 要排除的分支模式 |
path_includes |
array | 触发构建的文件路径模式 |
path_excludes |
array | 要忽略的文件路径模式 |
build_caching_enabled |
boolean | 启用或禁用构建缓存 |
environment_variables |
object | 此 trigger 特定的构建时变量 |
大多数 Builds API 操作遵循此模式:首先获取 Worker tag,然后获取 trigger UUID,再执行构建操作。

| Step | Action | Endpoint |
|---|---|---|
| 1 | 获取 Worker tag | GET /workers/scripts |
| 2 | 获取 trigger UUID | GET /builds/workers/:worker_tag/triggers |
| 3a | 触发构建 | POST /builds/triggers/:trigger_uuid/builds |
| 3b | 列出构建 | GET /builds/workers/:worker_tag/builds |
| 3c | 获取构建日志 | GET /builds/builds/:build_uuid/logs |
| 3d | 取消构建 | PUT /builds/builds/:build_uuid/cancel |
调用 Workers Scripts API 列出所有 Worker 并找到要使用的 Worker 的 tag:
curl -s "https://api.cloudflare.com/client/v4/accounts/{account_id}/workers/scripts" \
  --header "Authorization: Bearer <API_TOKEN>" \
  | jq '.result[] | {name: .id, tag: .tag}'
示例输出:
{
  "name": "my-worker",
  "tag": "1a2b3c4d5e6f7a8b9c0d1e2f3a4b5c6d"
}
{
  "name": "another-worker",
  "tag": "8a1b2c3d4e5f67890abcdef123456789"
}
保存 Worker 的 tag 值。你将在所有后续 API 调用中使用它。
使用 GET /builds/workers/{tag}/triggers 端点列出 Worker 的 trigger:
curl -s "https://api.cloudflare.com/client/v4/accounts/{account_id}/builds/workers/{worker_tag}/triggers" \
  --header "Authorization: Bearer <API_TOKEN>" \
  | jq '.result[] | {trigger_uuid, trigger_name, branch_includes, branch_excludes}'
示例输出:
{
  "trigger_uuid": "f47ac10b-58cc-4372-a567-0e02b2c3d479",
  "trigger_name": "Deploy production",
  "branch_includes": ["main"],
  "branch_excludes": []
}
{
  "trigger_uuid": "a1b2c3d4-e5f6-7890-abcd-ef1234567890",
  "trigger_name": "Deploy non-production branches",
  "branch_includes": ["*"],
  "branch_excludes": ["main"]
}
保存要使用的 trigger 的 trigger_uuid。请记住,你最多有两个 trigger:一个用于生产分支(例如 main),部署到实时 Worker;可选的一个用于所有其他分支,创建预览部署。
现在你已经有了 Worker tag 和 trigger UUID,可以触发构建、列出构建历史并获取日志。
使用 POST /builds/triggers/{uuid}/builds 端点,使用步骤 2 中的 trigger_uuid。
curl -s "https://api.cloudflare.com/client/v4/accounts/{account_id}/builds/triggers/{trigger_uuid}/builds" \
  --header "Authorization: Bearer <API_TOKEN>" \
  --header "Content-Type: application/json" \
  --request POST \
  --data '{"branch": "main"}'
你必须指定 branch、commit_hash 或两者:
| Field | Description |
|---|---|
branch |
要构建的 Git 分支名称(例如 main) |
commit_hash |
要构建的特定提交 SHA。如果仅提供而不提供 branch,则构建该提交当前所在的分支。 |
响应包含 build_uuid,可用于监控构建。
使用 GET /builds/workers/{tag}/builds 端点,使用步骤 1 中的 worker_tag。
curl -s "https://api.cloudflare.com/client/v4/accounts/{account_id}/builds/workers/{worker_tag}/builds" \
  --header "Authorization: Bearer <API_TOKEN>" \
  | jq '.result[] | {build_uuid, status, branch, created_at}'
响应包含每个构建的 build_uuid,获取日志或取消构建时需要它。
使用 GET /builds/builds/{uuid}/logs 端点。从以下来源获取 build_uuid:
- 列出构建
- 触发构建时的响应
- 按 script ID 获取最新构建
- 仪表板构建详情页面 URL 的最后一段
curl -s "https://api.cloudflare.com/client/v4/accounts/{account_id}/builds/builds/{build_uuid}/logs" \
--header "Authorization: Bearer <API_TOKEN>"使用 PUT /builds/builds/{uuid}/cancel 端点。从以下来源获取 build_uuid:
- 列出构建
- 触发构建时的响应
- 按 script ID 获取最新构建
- 仪表板构建详情页面 URL 的最后一段
curl -s "https://api.cloudflare.com/client/v4/accounts/{account_id}/builds/builds/{build_uuid}/cancel" \
  --header "Authorization: Bearer <API_TOKEN>" \
--request PUT使用 PATCH /builds/triggers/{uuid} 端点,使用步骤 2 中的 trigger_uuid。你可以更新什么是 trigger? 中描述的任何 trigger 字段。
curl -s "https://api.cloudflare.com/client/v4/accounts/{account_id}/builds/triggers/{trigger_uuid}" \
  --header "Authorization: Bearer <API_TOKEN>" \
  --header "Content-Type: application/json" \
  --request PATCH \
  --data '{
    "build_command": "npm run build:prod",
    "deploy_command": "npx wrangler deploy"
}'环境变量按 trigger 设置,这意味着你可以为生产和预览构建设置不同的值。例如,你可能在生产 trigger 上设置 NODE_ENV=production,在预览 trigger 上设置 NODE_ENV=development。请参阅环境变量 API 参考 了解完整端点详情。
使用步骤 2 中的 trigger_uuid。
curl -s "https://api.cloudflare.com/client/v4/accounts/{account_id}/builds/triggers/{trigger_uuid}/environment_variables" \
--header "Authorization: Bearer <API_TOKEN>"你可以为每个 trigger 设置不同的变量。例如,设置生产环境变量:
curl -s "https://api.cloudflare.com/client/v4/accounts/{account_id}/builds/triggers/{production_trigger_uuid}/environment_variables" \
  --header "Authorization: Bearer <API_TOKEN>" \
  --header "Content-Type: application/json" \
  --request PATCH \
  --data '{
    "NODE_ENV": {"value": "production", "is_secret": false},
    "API_KEY": {"value": "prod-secret-key", "is_secret": true}
  }'
以及预览构建的不同值:
curl -s "https://api.cloudflare.com/client/v4/accounts/{account_id}/builds/triggers/{preview_trigger_uuid}/environment_variables" \
  --header "Authorization: Bearer <API_TOKEN>" \
  --header "Content-Type: application/json" \
  --request PATCH \
  --data '{
    "NODE_ENV": {"value": "development", "is_secret": false},
    "API_KEY": {"value": "dev-secret-key", "is_secret": true}
  }'
将 is_secret 设置为 false 表示普通值,设置为 true 表示应在日志中屏蔽的敏感值。
使用步骤 2 中的 trigger_uuid。variable_key 是你设置的键名(例如 NODE_ENV)。
curl -s "https://api.cloudflare.com/client/v4/accounts/{account_id}/builds/triggers/{trigger_uuid}/environment_variables/{variable_key}" \
  --header "Authorization: Bearer <API_TOKEN>" \
--request DELETE使用 POST /builds/triggers/{uuid}/purge_build_cache 端点,使用步骤 2 中的 trigger_uuid。这将清除该 trigger 的缓存依赖项和构建工件。
curl -s "https://api.cloudflare.com/client/v4/accounts/{account_id}/builds/triggers/{trigger_uuid}/purge_build_cache" \
  --header "Authorization: Bearer <API_TOKEN>" \
--request POST以下示例展示 Builds API 的常见用例。
此示例演示仅使用 API 将 GitHub 仓库连接到 Worker 并设置自动构建的完整流程。
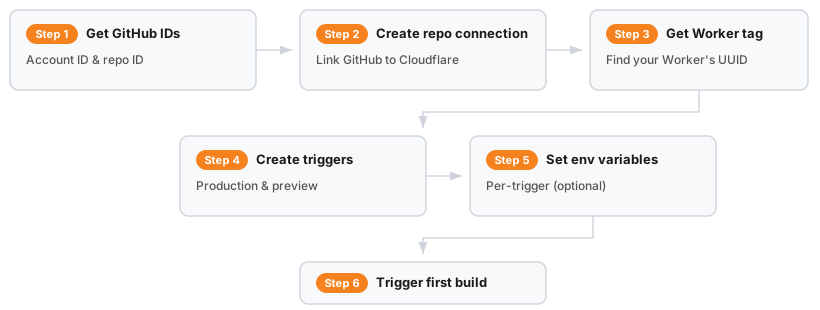
| Step | Action | Endpoint |
|---|---|---|
| 1 | 获取 GitHub 账户/仓库 ID | GET api.github.com/users/... and GET api.github.com/repos/... |
| 2 | 创建仓库连接 | PUT /builds/repos/connections |
| 3 | 获取 Worker tag | GET /workers/scripts |
| 4 | 获取 build token UUID | GET /builds/tokens |
| 5a | 创建生产 trigger | POST /builds/triggers |
| 5b | 创建预览 trigger | POST /builds/triggers |
| 6 | 设置环境变量 | PATCH /builds/triggers/:trigger_uuid/environment_variables |
| 7 | 触发首次构建 | POST /builds/triggers/:trigger_uuid/builds |
在使用 API 之前,必须首先通过仪表板安装 Cloudflare GitHub App:
- 在 Cloudflare 仪表板 ↗中前往 Workers & Pages。
- 选择任意 Worker 并前往 Settings(设置) > Builds(构建) > Connect(连接)。
- 选择 GitHub 并为你的账户或组织授权 Cloudflare GitHub App。
此一次性设置会在 GitHub 账户和 Cloudflare 之间创建连接。完成后,你可以使用 API 处理其他所有事项。
安装 GitHub App 后,你需要 GitHub 账户 ID 和仓库 ID。你可以从现有 trigger 或 GitHub API 获取这些 ID。
从 GitHub API:
# Get your GitHub user/org ID
curl -s "https://api.github.com/users/<GITHUB_USERNAME>" | jq '.id'

# Get a repository ID
curl -s "https://api.github.com/repos/<GITHUB_USERNAME>/<REPO_NAME>" | jq '.id'在 GitHub 仓库和 Cloudflare 之间创建连接:
curl -s "https://api.cloudflare.com/client/v4/accounts/{account_id}/builds/repos/connections" \
  --header "Authorization: Bearer <API_TOKEN>" \
  --header "Content-Type: application/json" \
  --request PUT \
  --data '{
    "provider_type": "github",
    "provider_account_id": "<GITHUB_USER_ID>",
    "provider_account_name": "<GITHUB_USERNAME>",
    "repo_id": "<GITHUB_REPO_ID>",
    "repo_name": "<REPO_NAME>"
  }'
保存响应中的 repo_connection_uuid。
curl -s "https://api.cloudflare.com/client/v4/accounts/{account_id}/workers/scripts" \
  --header "Authorization: Bearer <API_TOKEN>" \
| jq '.result[] | {name: .id, tag: .tag}'Build token 授权构建系统部署 Worker。要获取 build token UUID:
- 在 Cloudflare 仪表板 ↗中前往 Worker。
- 导航到 Settings(设置) > Builds(构建) > API token(API 令牌)。
- 选择现有 build token 或创建新 token。
你也可以通过 API 列出 build token:
curl -s "https://api.cloudflare.com/client/v4/accounts/{account_id}/builds/tokens" \
  --header "Authorization: Bearer <API_TOKEN>" \
  | jq '.result[] | {build_token_uuid, build_token_name}'
保存 build_token_uuid 供下一步使用。
创建在推送到 main 时部署的 trigger:
curl -s "https://api.cloudflare.com/client/v4/accounts/{account_id}/builds/triggers" \
  --header "Authorization: Bearer <API_TOKEN>" \
  --header "Content-Type: application/json" \
  --request POST \
  --data '{
    "external_script_id": "<WORKER_TAG>",
    "repo_connection_uuid": "<REPO_CONNECTION_UUID>",
    "build_token_uuid": "<BUILD_TOKEN_UUID>",
    "trigger_name": "Deploy production",
    "build_command": "npm run build",
    "deploy_command": "npx wrangler deploy",
    "root_directory": "/",
    "branch_includes": ["main"],
    "branch_excludes": [],
    "path_includes": ["*"],
    "path_excludes": []
}'为所有其他分支上的预览部署创建第二个 trigger:
curl -s "https://api.cloudflare.com/client/v4/accounts/{account_id}/builds/triggers" \
  --header "Authorization: Bearer <API_TOKEN>" \
  --header "Content-Type: application/json" \
  --request POST \
  --data '{
    "external_script_id": "<WORKER_TAG>",
    "repo_connection_uuid": "<REPO_CONNECTION_UUID>",
    "build_token_uuid": "<BUILD_TOKEN_UUID>",
    "trigger_name": "Deploy preview branches",
    "build_command": "npm run build",
    "deploy_command": "npx wrangler versions upload",
    "root_directory": "/",
    "branch_includes": ["*"],
    "branch_excludes": ["main"],
    "path_includes": ["*"],
    "path_excludes": []
  }'
注意不同的 deploy_command:生产使用 wrangler deploy,而预览使用 wrangler versions upload 创建预览 URL 而不影响实时部署。
设置生产环境变量:
curl -s "https://api.cloudflare.com/client/v4/accounts/{account_id}/builds/triggers/{production_trigger_uuid}/environment_variables" \
  --header "Authorization: Bearer <API_TOKEN>" \
  --header "Content-Type: application/json" \
  --request PATCH \
  --data '{
    "NODE_ENV": {"value": "production", "is_secret": false}
  }'
设置预览环境变量:
curl -s "https://api.cloudflare.com/client/v4/accounts/{account_id}/builds/triggers/{preview_trigger_uuid}/environment_variables" \
  --header "Authorization: Bearer <API_TOKEN>" \
  --header "Content-Type: application/json" \
  --request PATCH \
  --data '{
    "NODE_ENV": {"value": "development", "is_secret": false}
}'curl -s "https://api.cloudflare.com/client/v4/accounts/{account_id}/builds/triggers/{production_trigger_uuid}/builds" \
--header "Authorization: Bearer <API_TOKEN>" \
--header "Content-Type: application/json" \
--request POST \
--data '{"branch": "main"}'你的 Worker 现已连接到 GitHub。未来推送到 main 将自动触发生产部署,推送到其他分支将创建预览部署。
重新部署当前 active deployment 以刷新构建时数据。这在需要在没有代码更改的情况下重新构建时很有用。

| Step | Action | Endpoint |
|---|---|---|
| 1 | 获取 active deployment | GET /workers/scripts/:worker_name/deployments |
| 2 | 查找该版本的构建 | GET /builds/builds?version_ids=:version_id |
| 3 | 使用相同分支/提交重新触发 | POST /builds/triggers/:trigger_uuid/builds |
步骤 1:获取 active deployment 的 version ID
使用 GET /workers/scripts/{script_name}/deployments 端点,使用步骤 1 中的 worker_name:
curl -s "https://api.cloudflare.com/client/v4/accounts/{account_id}/workers/scripts/{worker_name}/deployments" \
  --header "Authorization: Bearer <API_TOKEN>" \
  | jq '.result.deployments[0].versions[0].version_id'
保存输出中的 version_id。
步骤 2:查找该版本的构建
使用 GET /builds/builds 端点,使用上一步的 version_id:
curl -s "https://api.cloudflare.com/client/v4/accounts/{account_id}/builds/builds?version_ids={version_id}" \
  --header "Authorization: Bearer <API_TOKEN>" \
  | jq '.result.builds'
从响应中,记下 trigger.trigger_uuid、build_trigger_metadata.branch 和 build_trigger_metadata.commit_hash。
步骤 3:使用相同分支和提交重新触发
使用 POST /builds/triggers/{uuid}/builds 端点,使用上一步的值:
curl -s "https://api.cloudflare.com/client/v4/accounts/{account_id}/builds/triggers/{trigger_uuid}/builds" \
  --header "Authorization: Bearer <API_TOKEN>" \
  --header "Content-Type: application/json" \
  --request POST \
  --data '{
    "branch": "{branch}",
    "commit_hash": "{commit_hash}"
  }'
同时传递 branch 和 commit_hash 会将构建固定到该分支上的该确切提交。
你可能使用了 Worker 名称而不是 Worker tag。Builds API 需要 tag(类似 1a2b3c4d5e6f7a8b9c0d1e2f3a4b5c6d 的 UUID),而不是 Worker 名称。请参阅步骤 1 获取 Worker tag。
有关其他构建错误,请参阅构建故障排查。
- Workers Builds REST API 参考 - 完整端点文档
- Workers Scripts REST API 参考 - 用于检索 Worker tag
- Workers Builds 概览 - 仪表板设置和配置
- 构建配置 - 构建设置和选项
- 创建 API 令牌 - 如何创建具有正确权限的令牌