
几乎每个网站——无论是简单的 HTML 作品集页面还是复杂的 JavaScript 应用——都需要表单来收集用户数据。Formspree ↗ 是一个后端服务,处理表单提交和存储,使开发者能够在网站上包含表单而无需编写服务端代码或函数。
在本教程中,你将使用纯 HTML 和 CSS 创建 <form>,并将其添加到托管在 Cloudflare Pages 上的静态 HTML 网站。请参阅 快速入门指南 熟悉平台。你将使用 Formspree 收集提交的数据,并在新提交到达时发送电子邮件通知,无需任何 JavaScript 或后端编码。
首先,创建新的 GitHub 仓库 ↗。然后在本地机器上创建新目录,初始化 git,并将 GitHub 位置附加为远程目标:
# create new directory
mkdir new-project
# enter new directory
cd new-project
# initialize git
git init
# attach remote
git remote add origin [email protected]:<username>/<repo>.git
# change default branch name
git branch -M main
现在可以开始在创建的 new-project 目录中工作。
本示例项目仅使用纯 HTML。首页将包含接受姓名、电子邮件地址和消息的 Contact Us 表单。
表单代码:
<form method="POST" action="/">
	<label for="name">Full Name</label>
	<input id="name" type="text" name="name" pattern="[A-Za-z]+" required />

	<label for="email">Email Address</label>
	<input id="email" type="email" name="email" required />

	<label for="message">Message</label>
	<textarea id="message" name="message" required></textarea>

	<button type="submit">Submit</button>
</form>
action 属性决定表单数据发送到哪里。稍后你将更新此属性,将表单数据发送到 Formspree。所有 <input> 标签必须有唯一的 name 才能捕获用户数据。for 和 id 值必须匹配,以便将 <label> 与相应的 <input> 链接,供屏幕阅读器等无障碍工具使用。
要将此表单添加到网站,首先在项目目录中创建 public/index.html。public 目录应包含所有前端资源,index.html 文件将作为网站首页。
将以下内容复制粘贴到 public/index.html 文件中,其中包含上述表单:
<html lang="en">
	<head>
		<meta charset="utf8" />
		<title>Form Demo</title>
		<meta name="viewport" content="width=device-width,initial-scale=1" />
	</head>
	<body>
		<!-- the form from above -->

		<form method="POST" action="/">
			<label for="name">Full Name</label>
			<input id="name" type="text" name="name" pattern="[A-Za-z]+" required />

			<label for="email">Email Address</label>
			<input id="email" type="email" name="email" required />

			<label for="message">Message</label>
			<textarea id="message" name="message" required></textarea>

			<button type="submit">Submit</button>
		</form>
	</body>
</html>
现在你有一个包含 Contact Us 表单的 HTML 文档,用户可填写多个字段。但你尚未将 action 属性设置为能处理表单数据的服务器。你将在本教程下一节中完成此操作。
HTML 表单已完成,但当用户提交此表单时,数据将以 POST 请求发送到 / URL。该 URL 没有服务器处理数据,因此会导致错误。要解决此问题,创建新的 Formspree 表单,并将其唯一 URL 复制到表单的 action 中。
要创建 Formspree 表单,请注册 Formspree 账户 ↗。
接下来,使用 + New form(+ 新建表单) 按钮创建新表单。将其命名为 Contact-us form,将收件人电子邮件更新为你希望接收表单提交的邮箱。然后选择 Create Form(创建表单)。
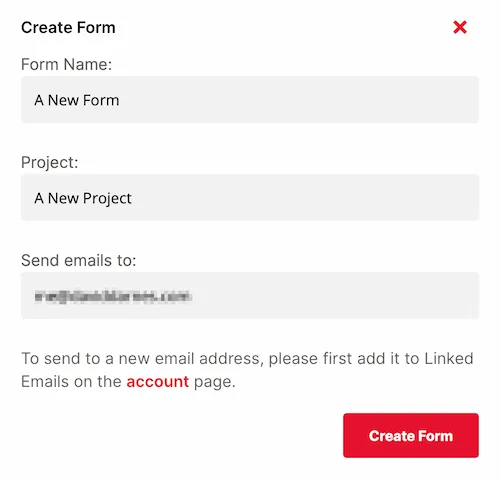
随后将显示如何集成新表单的说明。

复制 Form Endpoint URL 并粘贴到上面创建的表单的 action 属性中。
<form method="POST" action="https://formspree.io/f/mqldaqwx">
	<!-- replace with your own formspree endpoint -->
</form>
现在提交表单时,应被重定向到 Thank You 页面。表单数据将提交到你的 Formspree.io ↗ 账户。
你现在可以调整表单处理逻辑,更改重定向页面 ↗、更新通知电子邮件地址 ↗,或添加 Google Sheets ↗、Slack ↗ 等插件。
有关设置 Formspree 的更多帮助,请参阅以下资源:
- 有关 Formspree 的一般帮助,请参阅 Formspree 帮助站点 ↗。
- 有关 HTML 表单示例和灵感,请查看 Formspree 表单库 ↗。
- 有关与 Next.js、Gatsby 和 Eleventy 等流行平台集成 Formspree 的提示,请参阅 Formspree 指南 ↗。
现在可以部署项目。
若尚未完成,请在 git 中保存进度,然后将提交推送到 GitHub 仓库:
# Add all files
git add -A
# Commit w/ message
git commit -m "working example"
# Push commit(s) to remote
git push -u origin main
你的工作现在位于 GitHub 仓库中,这意味着 Pages 也可以访问它。
若这是你的第一个 Cloudflare Pages 项目,请参阅 快速入门 获取完整设置指南。选择适当的 GitHub 仓库后,必须使用以下构建设置配置项目:
- Project name(项目名称) – 你的选择
- Production branch –
main - Framework preset(框架预设) – None
- Build command(构建命令) – None / Empty
- Build output directory(构建输出目录) –
public
选择 Save and Deploy(保存并部署) 后,Pages 项目将开始首次部署。成功后,你将获得唯一的 *.pages.dev 子域和实时演示链接。
在本教程中,你使用 Cloudflare Pages 和 Formspree 构建并部署了网站来处理表单提交。你创建了一个带有表单的静态 HTML 文档,该表单与 Formspree 通信以处理和存储提交请求并发送通知。
若要查看此应用的完整源代码,可在 GitHub ↗ 上找到。